

Sometimes, it is confusing if you are developing IoT or Robotics logics in Web-Interface, DesktopApp, AndroidApp to access RPi.GPIO. This post will guide you all GPIO configuration modes.

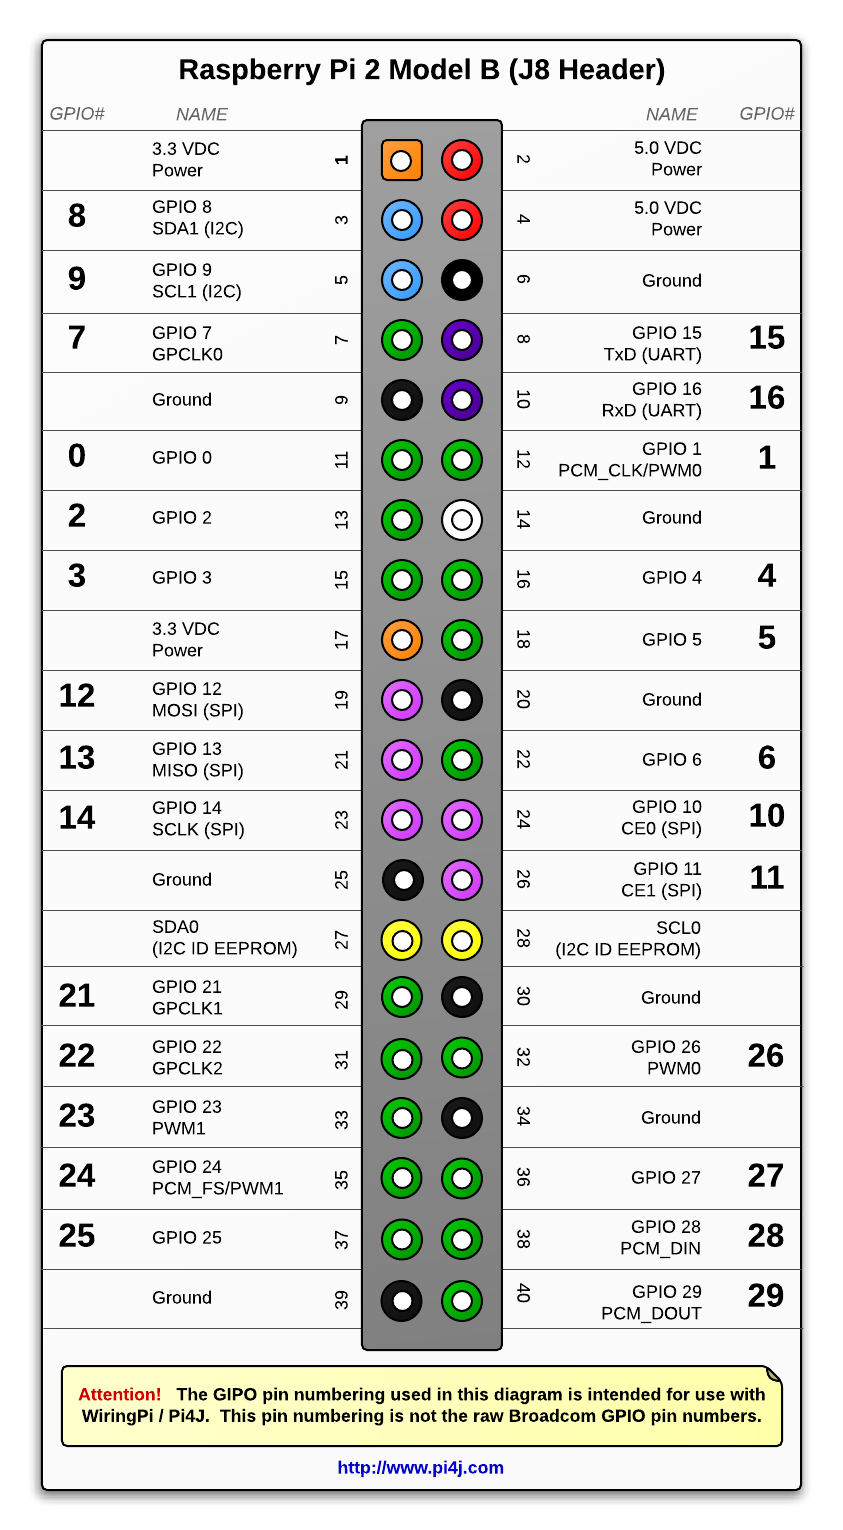
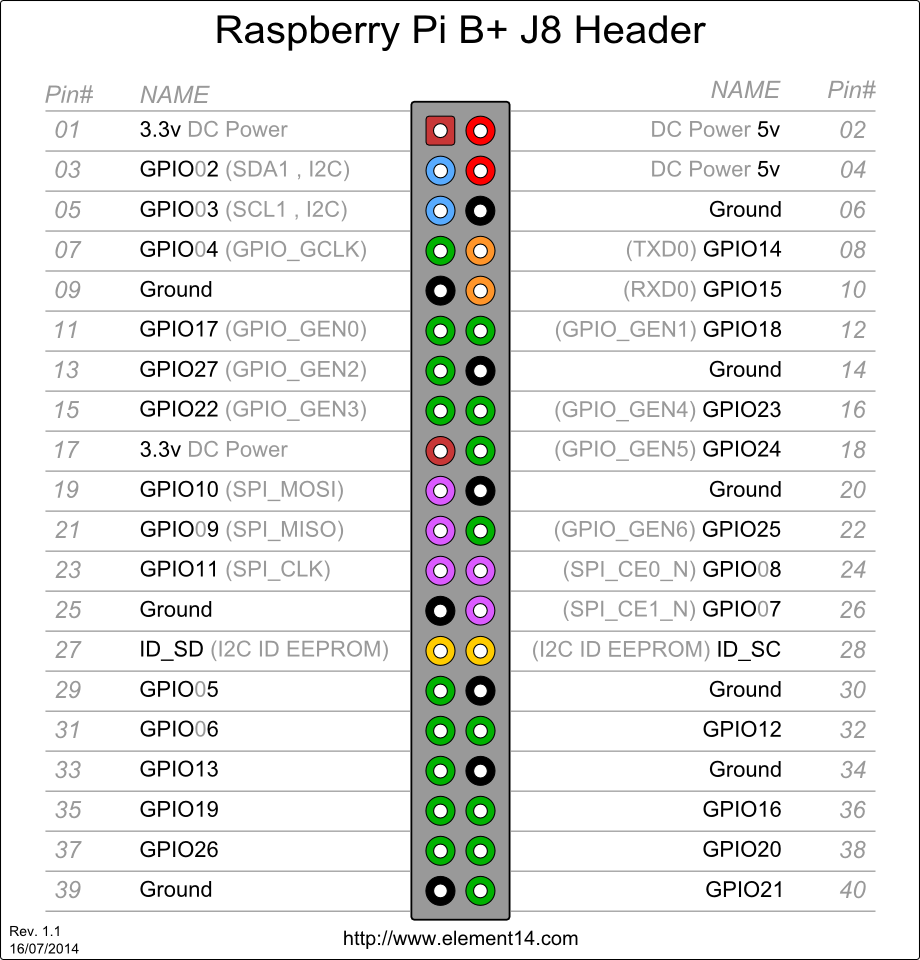
- 1. Physical Numbering: This gives exact PIN numbers starting from 1-40
- 2. BOARD Configuration: This mode was used in earlier model A pi frequently & generally used when you are writing some drivers, libraries at kernel level or in .h files
- 3. WiringPi: This mode is used if you are trying to access GPIO from php or command line http://wiringpi.com/the-gpio-utility/
-
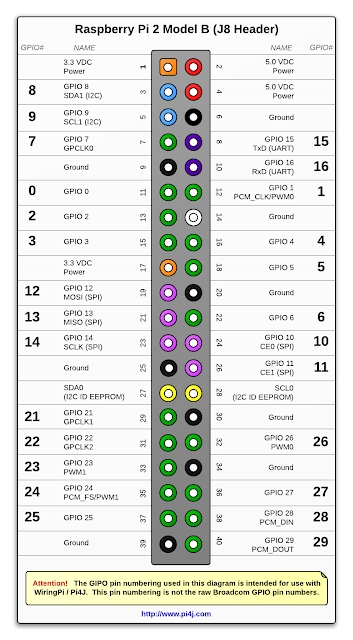
- 4. BCM Configuration: This mode is frequently used from various programming languages specially python codes. BCM GPIO PINS changed from model A to B.
Sensing GPIO input for different types of sensors & switches:
- GPIO.setup(channel, GPIO.IN, pull_up_down=GPIO.PUD_UP)
- channel = GPIO.wait_for_edge(channel, GPIO_RISING, timeout=5000)
Command-line gpio access:
- gpio readall: Displays all GPIO status
- gpio write <pin> 1/0: Write PIN high/low
- gpio read <pin>: Read PIN status
- Read more: http://wiringpi.com/the-gpio-utility/
GPIO handling interrupts for infinite loop:
try:
while 1:
if GPIO.input(pin):
print "ON"
else:
print "OFF"
break
except KeyboardInterrupt:
print "Ctrl+C pressed"
finally:
GPIO.cleanup()
GPIO handling interrupts in PyQt:
- Create another worker class that will contain gpio control function.
- Inherit worker class instance in MainUI.
- On clicked.connect() of qpushbuttons or any signal slots call worker.gpiocontrolfunction()
import sysRead more: https://stackoverflow.com/questions/37008975/update-gui-from-event-in-python-qt & https://stackoverflow.com/questions/25710209/how-to-interrupt-qthread-from-pyqt-gui
import time
from PyQt4 import QtGui, QtCore
class Worker(QtCore.QObject):
def __init__(self, parent=None):
QtCore.QObject.__init__(self, parent)
self.t1 = QtCore.QThread()
self.moveToThread(self.t1)
self.t1.start()
def do_stuff(self):
while True:
print 'loop'
time.sleep(1)
class MainWindow(QtGui.QWidget):
def __init__(self, parent=None):
QtGui.QWidget.__init__(self, parent)
self.worker = Worker()
self.button = QtGui.QPushButton('start', self)
self.button.clicked.connect(self.worker.do_stuff) # connect directly with worker's method do_stuff
#self.button.clicked.connect(lambda: self.worker.do_stuff()) # connect with lambda object containing do_stuff
app = QtGui.QApplication(sys.argv)
main = MainWindow()
main.show()
sys.exit(app.exec_())
GPIO access from PhP for web-interface & home/office automation:
- GPIO.OUT
<?php
system("gpio mode 28 out");
if(isset($_POST['off3']))
{
echo '<img src="images/fan-off.png"; exec("gpio write 28 0");
}
if(isset($_POST['on3']))
{
echo '<img src="images/fan-on.gif";
exec("gpio write 28 1");
}
?>
- GPIO.IN
system("gpio mode 25 in");
exec("gpio read 25",$status);
if($status[0]==0)
echo '<img src="images/sad-plant.jpg";
- Reload php page automatically
<?php
$page = $_SERVER['PHP_SELF'];
$sec = "2";
?>
GitHub homeautomation project: https://github.com/vsltech/home-automation
Read how to find Raspberry Pi IP without HDMI display: http://www.vslcreations.com/2018/01/how-to-find-raspberry-pi-ip-without.html
Read how to start image processing in Raspberry Pi: http://www.vslcreations.com/2017/06/how-to-start-image-processing-for.html
Read how to find Raspberry Pi IP without HDMI display: http://www.vslcreations.com/2018/01/how-to-find-raspberry-pi-ip-without.html
Read how to start image processing in Raspberry Pi: http://www.vslcreations.com/2017/06/how-to-start-image-processing-for.html


0 comments:
Post a Comment
Thanks for your comment. We will try to reply as soon as possible.
Regards
VSL Creations