

If you are trying to build your own robot & confused which motor driver, battery, chasis, wheels & controller to use for smooth functioning then this is post will give you a brief idea.
- Mechanics: If you are not from mechanical domain then don't go for designing your own chassis or adding any extra load to your bot because at end of execution your bot will not give you proper rotation, movement & control. The best solution is to buy DIY kits from existing designs or include some mechanics expert in your group. Robot Forward, Backward, Left & Right movements completely depend on the base load distribution & wheels contact the ground surface. Robot wheels must provide enough friction to accelerate the Robot load, if the friction is too much then there is a high chance of burning bot motor driver this happens a lot of times with belt wheels.


-

-

-

-

-


- Motor Driver: Even if you have to build your bot design perfect it requires proper power source & motor drivers to drive your bot efficiently. If your bot is heavy & wheels produce more friction then use L298N Dual H-Bridge Motor Driver which is best if you are trying to interface with your RPi & control bot from any python based GUI over WiFi.

- If your bot is heavy then use 4 DC motors & connect (+) (--) of both Left motors & Right motors respectively this will give you more throttle.
- Movement Logic of Robot in case of 2 Motors at the rear of the bot:

- Movement Logic of Robot in case of 4 Motors: Same logic because left side & right side of both motors are short inducing more throttle. But when you try for Left/Right turn your Robot will not move especially if the load is high, even if you inverse the Left & Right motor logics as forward & backward respectively then also no result. The solution is either you add track belts to wheel or use 2 motor drivers & give independent control to all 4 Motors which makes it more complex.
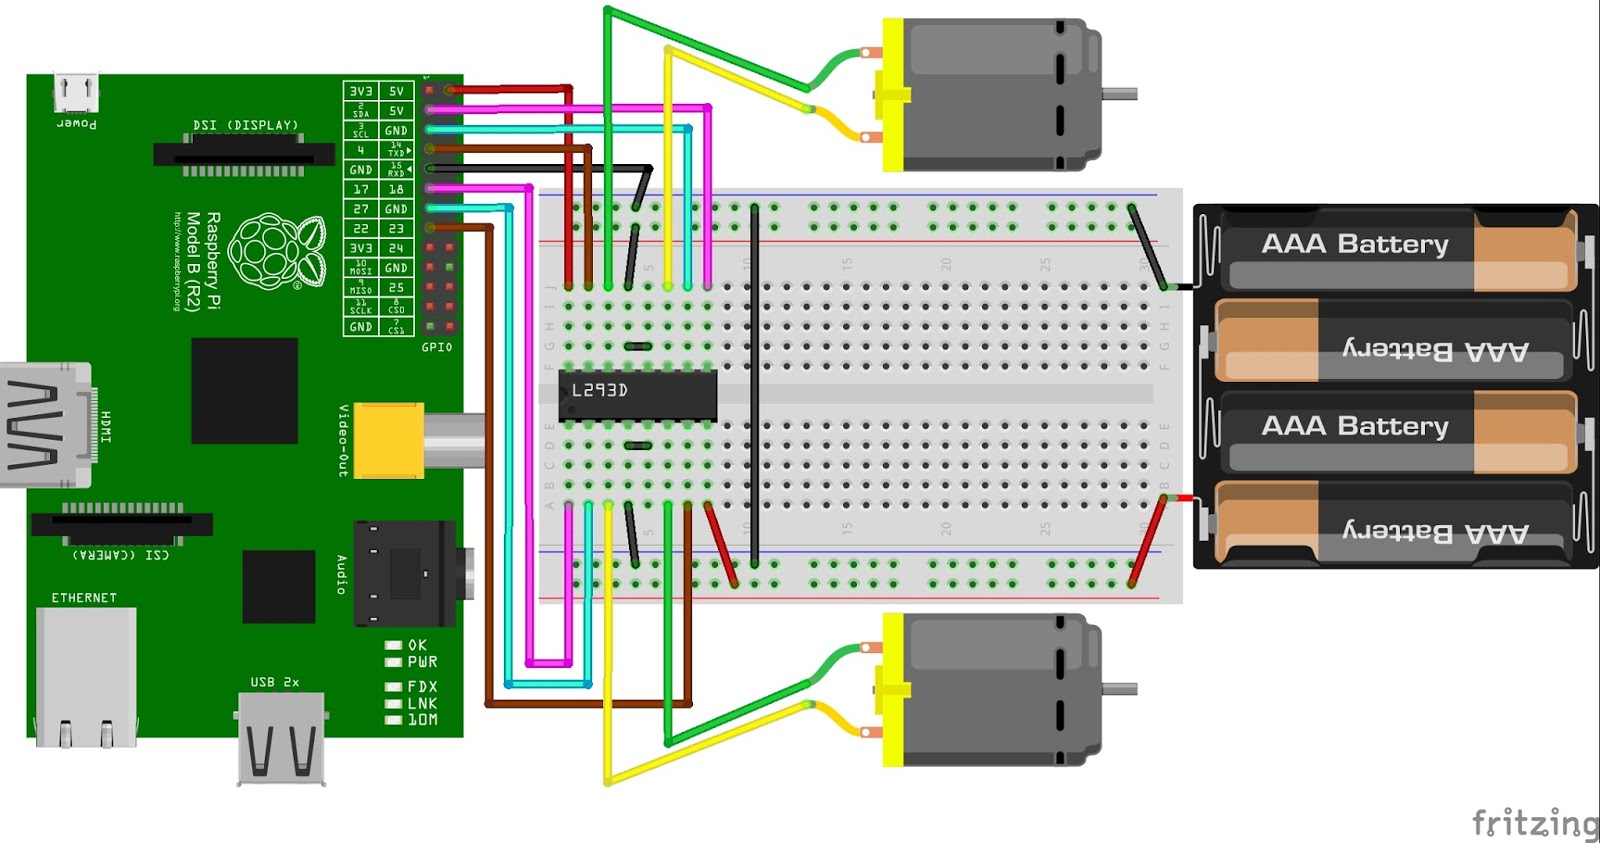
- Use L293D Motor Drivers for controlling Arm, Gripper etc. because this IC burns when supplied 12Volts for a long time especially when your Robot is heavy.


- Wiring & Circuits: Make a note of all GPIO pin numbers as you connect to the PINS of motor drivers to avoid any confusions later.

- Use bread-board & cobbler cable.
- Use GPIO printed sheet.

- Double check your GND Pins properly connected to common GND of RPi, Motor Drivers & External Battery.

- Coding & GPIO Handling: Always keep your GPIO clean & add error handlings or key interrupts while testing because if GPIO is not cleaned then testing of your Robot becomes very difficult every time.
- For GPIO interrupt handling from GUI read this post: http://www.vslcreations.com/2018/01/raspberry-pi-gpio-configurations-bcm.html
GitHub: https://github.com/vsltech/AddyControllerPygame/blob/master/robot.py


GUI to control robot movements on the press of Key which is very useful when you are testing your Robot over WiFi use Putty. Read about RPi remote control: http://www.vslcreations.com/2018/01/how-to-find-raspberry-pi-in-without.html
import RPi.GPIO as GPIO
import os
GPIO.cleanup()
GPIO.setmode(GPIO.BCM)
GPIO.setwarnings(False)
pin1 = 2
pin2 = 3
in1 = 4
in2 = 17
in3 = 27
in4 = 22
GPIO.setup(pin1,GPIO.OUT)
GPIO.setup(pin2,GPIO.OUT)
GPIO.setup(in1,GPIO.OUT)
GPIO.setup(in2,GPIO.OUT)
GPIO.setup(in4,GPIO.OUT)
GPIO.setup(in3,GPIO.OUT)
#PUMP
def pump():
GPIO.output(pin2, GPIO.HIGH)
print "pump running"
GPIO.output(pin1, GPIO.LOW)
#WHEELS
def backward():
GPIO.output(in1, GPIO.HIGH)
GPIO.output(in3, GPIO.HIGH)
print "fbackward running motor "
GPIO.output(in2, GPIO.LOW)
GPIO.output(in4, GPIO.LOW)
def forward():
GPIO.output(in2, GPIO.HIGH)
GPIO.output(in4, GPIO.HIGH)
print "forward running motor"
GPIO.output(in1, GPIO.LOW)
GPIO.output(in3, GPIO.LOW)
def right():
GPIO.output(in2, GPIO.HIGH)
GPIO.output(in4, GPIO.LOW)
print "right running motor"
GPIO.output(in1, GPIO.LOW)
GPIO.output(in3, GPIO.LOW)
def left():
GPIO.output(in1, GPIO.LOW)
GPIO.output(in3, GPIO.LOW)
print "left running motor "
GPIO.output(in2, GPIO.LOW)
GPIO.output(in4, GPIO.HIGH)
def clean():
GPIO.cleanup()
def stop():
print "Now stop"
GPIO.output(in2, GPIO.LOW)
GPIO.output(in4, GPIO.LOW)
GPIO.output(in1, GPIO.LOW)
GPIO.output(in3, GPIO.LOW)
GPIO.output(pin1, GPIO.LOW)
GPIO.output(pin2, GPIO.LOW)


- If you are building Robot Control software from GUI then use pygame or tk-inter because handling GPIO interrupts in while 1 infinite loops are much easier than PyQt.
- sudo apt-get install python-pip
- sudo pip install pygame

References:


0 comments:
Post a Comment
Thanks for your comment. We will try to reply as soon as possible.
Regards
VSL Creations